|
Toner Transfer Method
|
|
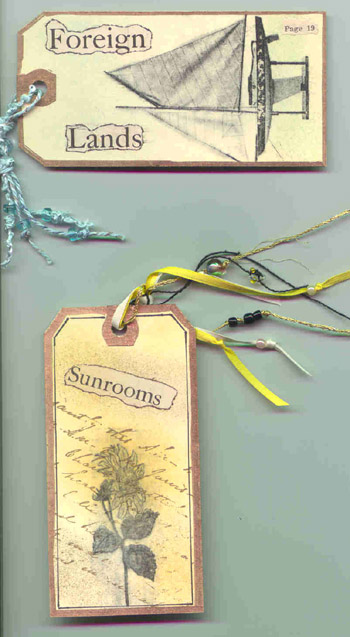
This is a VERY easy technique and perfect
for tags (as well as other papers). Here's
how:
Materials needed:
-copies of pictures you want to transfer (Remember they will be
mirror images, so words/letters will not work. Also, you may
want to enlarge or reduce your images when copying so they will
fit on a variety of target papers.)
target paper (tags, scrap paper, card stock, lg./sm.
envelopes, etc.)
-lacquer thinner (32 oz. for $6-8 at hardware store) -- do NOT
store this in any other container than the metal can it comes in
-cotton balls
-several layers of scrap paper to place under your target paper (I
place these on top of my 12" x 18" cutting mat to
further protect my desk)
___________
Note: All copy toner is NOT the same. My Kinko's has a large
self-serve machine (model 5690) that uses the type of toner that
transfers best. All the other machines in the store use a
different toner, which does NOT transfer at all! Laser
printers will work, too, so if you have one, you don't have to go
to the copy shop. Fresh copies will work best.
Once you have your image, trim around it. I trim carefully
on some images and leave a wide margin on others. If the
image is surrounded by white space, there's no need to trim
carefully (unless you want to use the image to glue onto something
after you transfer most of the toner -- this is also a very nice
look and I do use some of mine for this). Consider, too,
that if the area around your copied image is noticeable, but still
lighter than the image itself, it will transfer to the target as
such, almost a halo effect. This might be a desirable effect
on some pieces, not on others. Keep in mind, too, that you
can trim carefully BEFORE you reproduce the image and effectively
reduce the amount of cutting time spent on each image before you
transfer it.
After the image is trimmed the way you want it, pour a *small*
amount (a teaspoon or two for smaller projects) of lacquer thinner
into a plastic / glass dish and dip a cotton ball into it.
This stuff evaporates quickly and a 32 oz. can will last a long
time if you only pour small amounts each time. Pour the
leftover thinner back into the can when finished.
Place your image face down on the target paper. Squeeze out
MOST of the lacquer thinner from the cotton ball. Apply the
liquid to the back (top surface) of the copy by rubbing the cotton
ball over the paper. If you apply too much, it not only
transfers the toner to your target, it then mixes it all up before
soaking in and you get a dark blob instead of a mirror image of
your picture. You can determine your progress pretty well as
you transfer the image: when you see details come
through the top of the copy paper, the toner has been transferred
to the target paper. Copies can often be used with this
method a second or third time, depending on how recently they were
produced and how much lacquer thinner you use on each application.
If the image does not transfer correctly the first time, it's
definitely worth a second attempt. Keep this in mind for
"older" copies (those not freshly made). Sometimes
the first attempt will be a dud, but the second will be beautiful.
|
|
That's about it. You can remove the used Xerox copy immediately
after applying the thinner. The thinner dries almost
instantly. But you should do this technique in a well ventilated
area because the fumes are rather potent. It takes a little
experimenting to find out what the right amount of lacquer thinner is
(less is better!), so make plenty of copies of your image (s); this
way, you won't run out of things to play with before you get the hang
of it.
I like to finish my pieces off with gold or silver leafing pen (Krylon
is my favorite), maybe a word stamp over the image, some stippling,
sometimes glued words from old mags/newspapers. After all this,
I spray the piece with a fixative (Krylon Clear Acrylic).
BTW, you can do this technique with COLOR copies, too, but not on an
average (home) color printer - toner must be used in the
printing/copying process. Home color printers use ink but color
printers at copy shops use toner. There have been several
excellent articles in Somerset Studio over the last year explaining
this process, so go through your back issues!!
|
| This tutorial was contributed by: Anne Rogers |
| Web site coming soon....... |